Using an SLR with a Skywatcher Explorer 130M Telescope
I’m really keen to take some photos through our new telescope. I knew this wouldn’t be easy. The world of astro-photography is complex with many diverse techniques that need to be learnt, practised and perfected. Some of the photos you can achieve are truly outstanding, but I think it will be many years before we get that good at it.
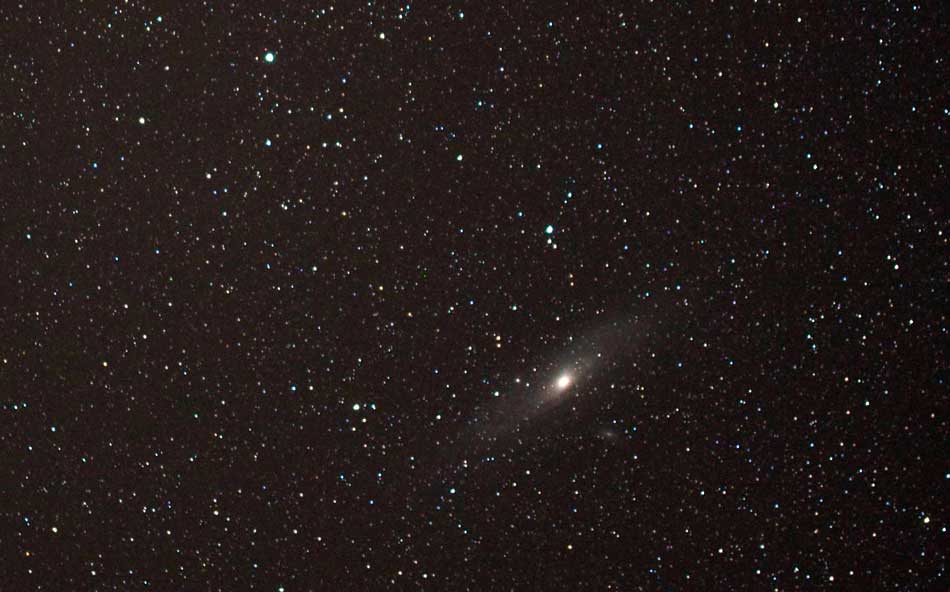
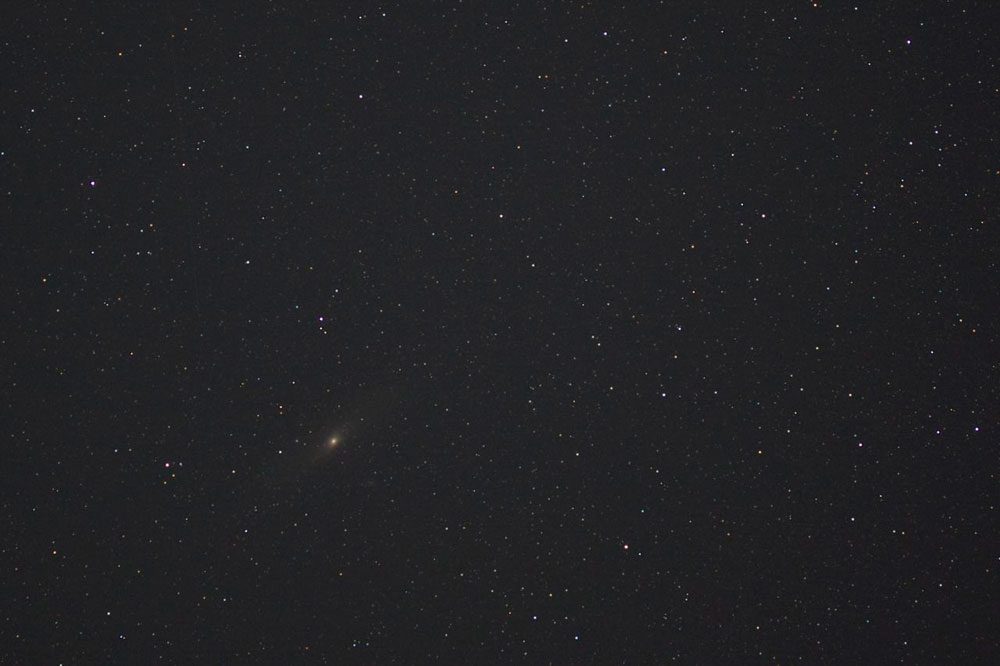
It would be great to get just a few basics shots though so that I can share some of what we see through the telescope here on our weblog. Ultimately the goal will be to use astro-photography to reveal astronomical objects that can’t be seen visually through the telescope. Long exposure astro-photos can reveal much more detail and resolution than can be seen with the eye, and some exposures can be taken over several hours, allowing objects that are far too faint to be seen with the eye to be recorded on the cameras sensor / film.
As you can imagine, there is a learning curve, and a steep one at that. We should really start using just and SLR on a tripod, taking photos of things such as constellations and star trails, then progress onto longer exposure SLR photos with the camera mounted piggyback on the telescope, before moving onto prime focus SLR photography where you attach the SLR camera directly to the telescope and use the telescope as the camera lens.
I will of course do all of this, but being the impatient type with a digital SLR and a new telescope, I can’t wait to connect the two and see if I can take photos – even fairly basic ones – of what I can see through the telescope. However, simply attaching the SLR to the telescope hasn’t proved to be as easy as it should have.
Physical Connection
The physical connection is actually very simple. The eyepiece holder on our Skywatcher Explorer 130M telescope has a T-Mount thread on it, so with the purchase of a simple T-Mount for my Canon EOS 350d SLR camera, the two can be connected. I just have to remove the eyepiece(s) from the telescope, screw on the T-Mount and then connect the camera body to it. Nothing could be simpler and the fact that the eyepiece holder on the telescope has this thread would suggest that it was designed just for this.

T-Mount for Canon EOS Camera
Achieving Focus
So, my T-Mount arrived and I was excited to try it out. I attached the two, pointed the scope at the Moon and tried to focus using the Live View image on the cameras LCD. The best focus I could get was by moving the focuser all the way into the telescope as far as it would go, but there just wasn’t enough inward travel to achieve proper focus. I’ve since done quite a bit of research into this and it seems to be a problem that everyone has with this telescope. Despite the ability to physically attach an SLR to the eyepiece holder, there isn’t enough inward movement on the focuser to achieve focus, all you get is a blurry blob where the Moon – anything else for that matter – should be.
Possible Solutions
Now, amateur astronomers and astro-photographers are of course a resourceful bunch, so there are many possible solutions to this problem. Some sound a little drastic to me, others have their pros and cons and I’ve come up with one or two myself as well.
Using a Barlow Lens
Simply placing a barlow lens into the eyepiece holder of the telescope and attaching the camera to this should allow focus to be achieved. The barlow lens increases the focal length of a scope, so the point at which focus occurs is extended out of the scope focuser a short distance.
In order to do this an additional (inexpensive) T mount adaptor needs to be purcahsed. This slots into the barlow lens and has a T mount thread on the end of it which allows attachment of the T-mount and camera to the telescope. Alternatively, some barlow lenses themselves come with a T-mount thread built in (2x barlow lens with built in T-Mount thread). I’ve heard that using a barlow lens with a T-Mount thread on it rather than a T adaptor is better, because it is possible that the T adaptor will again add some distance between the camera and the telescope taking us back to square one where there isn’t enough inward travel available on the focuser to achieve focus even with the barlow lens in place.
It should be noted of course that the barlow lens’ primary function is to provide magnification resulting in a reduced field of view. This may or may not be an issue depending on the types of objects you want to photograph.
Moving the Primary Mirror
Some people have moved the primary mirror of the telescope up the tube, closer to the secondary mirror. This has a similar effect to that of using a barlow lens as it moves the focal point of the telescope further out of the eyepiece. In many cases longer bolts have had to be used to move the mirror far enough, although some people have achieved focus by only moving the mirror a few millimetres. The mirrors do of course need re-collimating after moving them and this sounds like a modification that is just a little too involved for me as a beginner at the moment. It does work, but the main issue other than the work involved is that once the mirror is in a position that allows the camera to reach focus, there then often isn’t enough outward movement on the focuser to achieve focus with some eyepieces.
There is a good thread on the subject here: Going to mod my Skywatcher 130P
Altering the Focuser
Another fairly drastic approach would be to modify the focuser on the telescope. Buying an alternative focuser that has more inward movement would work. These however are very expensive and I’m not sure which ones would work as a replacement.
The other option is to modify the focuser that comes with the Skywatcher 130 telescope. The focuser itself is actually a fairly simple, mainly plastic affair that consists of a plastic cylinder with an eyepiece holder inside a plastic housing. The housing is attached to the telescope and the cylinder is moved up and down within the housing using a simple rack and pinion mechanism. The factor that limits the inward movement of the assembly is the eyepiece holder hitting the plastic housing of the focuser. There is actually about 12mm of plastic housing above the rack and pinion mechanism that could be removed without affecting the functioning of the focuser. This would allow an additional 12mm of inward movement that maybe enough to achieve prime focusing with an SLR attached to the eyepeice holder.

Skywatcher 130 Focuser
I don’t want to take a hacksaw to our new telescope quite yet, but this does seem like a modification that would work without causing any other issues.
Using a smaller T-Mount
Using a thinner T-Mount may be one of the simplest approaches. The T mount I have is quite thick and probably moves the camera about 10mm away from the telescope. It may be possible to find low-profile T Mounts that allow you to attach your camera to the telescope without this additional thickness, although I haven’t been able to find one. They do have to be a certain thickness and move the camera a certain distance from the eyepiece assembly to prevent the cameras mirror fowling on the assembly though. More research is needed here.
Reducing the Size of the Eyepiece Holder
The Eeypiece holder of the Skywatcher 130M is removable. It is an aluminium ring that screws onto the plastic focusing tube. It therefore has an internal thread that matches that of the thread on the plastic focusing tube, two grub screws through its main body that hold the eyepieces in place and then (as already mentioned) an external T-Mount thread on the other end that allows a T Mount to be attached to it.

Focuser with Eyepiece Holder Removed

Internal Thread on Eyepiece Holder

External T Mount Thread on Eyepiece Holder
As you can see, the eyepiece holder itself is fairly tall (22mm). Someone fairly handy at engineering such things could probably produce one that is half the size. Again, this would allow the camera to be mounted 10mm closer to the scope which might provide enough inward movement to achieve prime focus with an SLR.
Digiscoping
Another option would be to attach the camera to the telescope using a digiscoping attachment. In effect this mounts the camera, complete with its own lens in front of the eyepiece of the telescope so that you can take photos through the eyepiece. Whilst this might seem like a goo idea, I doubt that the eyepiece assembly, or the telescope mount would be robust enough to hold a large SLR camera and its lens in this way. It would probably be OK with my small compact camera, but I then lose the detailed exposure controls available through the SLR.
What is best?
As you can see, there are lots of options to try, some have fewer issues associated with them than others, some are a little more destructive than others. I haven’t quite decided what route I’ll take yet – probably the easiest, cheapest and least destructive is the barlow lens with built in T-mount thread so I shall start with that. If I can find someone who can make me a low-profile eyepiece holder then that may be my next plan of attack. I’ll let you know how I get on.
It is however a shame that this is such an issue, the fact that the Skywatcher Explorer 130M telescope comes with an eyepiece holder that has a T-Mount thread allowing for direct SLR attachment and prime focus astro-photography would seem to suggest that it would be suitable for such a purpose. Unfortunately, out of the box it isn’t, but with just a small modification to the focuser it would be, so its a shame that the manufacturers haven’t addressed this.


Our new x2 deluxe barlow lens arrived yesterday. Once again, good service from http://www.harrisontelescopes.co.uk again as I only ordered it online the day before. They also told me to buy the Celestron barlow rather than the skywatcher one as it is exactly the same, but quite a bit cheaper.
As mentioned in the post above, the difference between the deluxe barlow lens and the standard one that came with the Skywatcher telescope is that it has a T thread on the end of it so that I can attach my SLR to it.
The skies have been cloudy for what seems like forever so I haven’t yet had the opportunity to test it, but I did attach the SLR to the barlow lens yesterday and managed to take a photo through it across the field in the back garden. I was able to achieve focus with quite a bit of inward focus remaining, so things are looking promising.
Using the barlow lens all the time will result in a reduced field of view, but I’ll have to live with that for a while until I’m brave enough to modify the scope itself or get someone to make me a smaller eyepiece holder. I guess there’s nothing stopping me from stitching together several photos to build an image with a larger field of view.
All we need now are some clear skies so that I can try it out.
Hi. Nice article that I have found while searching for a possible solution of the same trouble that I have faced with my SK 130. Interestingly, Sky watchers itself could not give the answer anywhere.
1. using a barlow lens is a good option but you loose your targeted F and exposure speed.
2. Removing 12mm extra space after the rack pinion mechanism in focuser tube also does not get your camera at proper distance. One needs to have extra 16mm + additional inward travel of the camera to get the focal plane coincided to its film plane.
3. I have cut the tube, then removed the eyepiece holder and then attached the camera with the T Mount adapter to focuser tube thread witha self made small both side threaded aluminium ring.
4. one more trouble with the focuser is it does not come with any lock. So I had to drill the focuser assembly holder at two places and tap 1/4 thread in them. Put two nylon long head screws there to work as focus lock.
Now things are ok.
Regards-
Debasis
Secretary Sky Watcehrs Association of North Bengal
http://www.skywatchersindia.com
https://www.facebook.com/skywatchersindia?fref=ts
Hi Alan,
How did you get on with the Barlow? I have the same Skywatcher 130 scope hence the same problem! If it worked, would you be kind enough to send me a link to the correct Barlow & T ring needed?
Best wishes,
David,
Anglesey
Hi David,
It does work with the barlow lens in as much as using it with the T mount gives me enough inward focussing movement to achieve focus… However I’m still not getting great result thanks to the fact that my SLR camera is a little too heavy for the mount and keeping the whole thing still for long enough is next to impossible with the mount I have. I do however have a very heavy DSLR with and extra battery grip attached, maybe if I removed that I’d have more luck.
The Barlow lens I use is this one:
http://www.amazon.co.uk/gp/product/B004ORVWZW/ref=as_li_ss_tl?ie=UTF8&camp=1634&creative=19450&creativeASIN=B004ORVWZW&linkCode=as2&tag=alslikklworls
Hope that helps,
Al.
That’s brilliant Alan, thanks very much! I’ll give that a try!
Best wishes,
David 🙂
Hi Alan, just a quick note to say thanks very much – the Barlow worked beautifully and I’ve posted the solution on one of the astronomy facebook groups!
David 🙂
Hi
Thanks a lot for this very lengthy and nice “troubleshooting”. My girlfriend just got the 130p telescope as a present (yea a nice one) and we were trying to fit a dslr on it, well the same problem with the focusing of course happened.
She did get a barlow with the t-adapter and using that we could focus it, however when taking a photo of a distant tree, the image is of a very very low quality. Really, it looks like a camera-phone shot:)
We could not try it out on the sky yet due to overcast day/night in Holland.
So i wonder if that makes a difference, did you manage to get satisfying images through the barlow lens?
thanks a lot
Hi there, yes the images were great. The magnification is such that half the moon fills the shot which is super for detail & all you need to do is take 2 or 3 shots & stich them together in the free Microsoft ICE program. Try a shot of Jupiter too.
David 🙂
Sounds great David… Are the photos online anywhere for us to see them?
Al.
Hi Al,
Try this link to my twitter: https://mobile.twitter.com/DavidLupton/status/272124552241377280/photo/1
🙂
Excellent, looks good… Makes me wish we had some clear skies to see what I could come up with.
Al.
Well, I tried to remove the plastic on the focuser. It was easy. However, there is still not enough inward travel to reach focus. Thanks for the info.
Thanks for posting this – I’ve got an SK1309EQ2 aka SkyWatcher Explorer 130M telescope, and have tried this myself. I used a “Low Profile Canon EOS T Ring” which adds only 1mm to the camera body, but that alone is not enough to reach focus:
http://astrobeano.blogspot.com/2013/02/sk1309eq2-prime-focus-canon-eos-1000d.html
I have managed to reach focus. I sawed off the plastic part of the outside tube. Then I unscrewed the eyepiece holder. This reveals another screw thread – it’s 40mm. I purchased a 42mm to 39mm ring adapter from eBay and filed it down a little. This gave me enough bite to get the t adapter mounted on a few turns.
hi Steve could you make a picture from the modification and equipment and share to us I have the same SW
or send a picture to me
Hi, I have a Skywatcher 130m and have the same focusing issue, I’ve gone for now with a long 2x Barlow which is 12cm long attached to a T mount which seems to put the lens further in towards the secondary mirror and with this I get pretty good focus on the Moon. Struggling though to get planets etc. This is a shot of the moon using my 130M, 2X 12cm Barlow and canon 1100D, oh and stitching two images with MS ICE.
https://www.facebook.com/bkhphotos/photos/a.1575346796041110.1073741838.1575305519378571/1665198063722649/?type=3&theater
Has anyone had success focusing on planets etc.
Nice photo Bryan! 🙂
Al.
Re: “Altering the focuser” be warned that there is an inner ring of material, slightly smaller diameter, at the top on the end of the black outer tube. This is load-bearing so if removed (speaks from experience) dramatically increases the focus tube wobble. Having taken a good few mil’s off mine I hope to shim the interior of the tube to give it a snug new load-bearing surface (mega-super glue and PTFE sheets on order!)
Just added duct tape to the silver barrel of mine just to take up the internal fit/wobble and tightened up the rack screws to try an stiffen the whole assembly feels much better now. ( I have not removed any of the housing just tried a barlow lens piece screwed to the T ring extension tube worked ok