PDF to PNG Automator Script – Batch Processing
A bit of a geeky post for you today and a quick and easy way to batch process a PDF to PNG’s using Automator. In fact it allows you to batch process a multi-page pdf file into a number of image types if you wish. You may think this is a bit of an obscure thing to be doing, but it’s something I do fairly regularly during the production of our Weblog Book, so here’s how to do it using an Automator Application script.
Batch Process PDF to PNG Automator Script
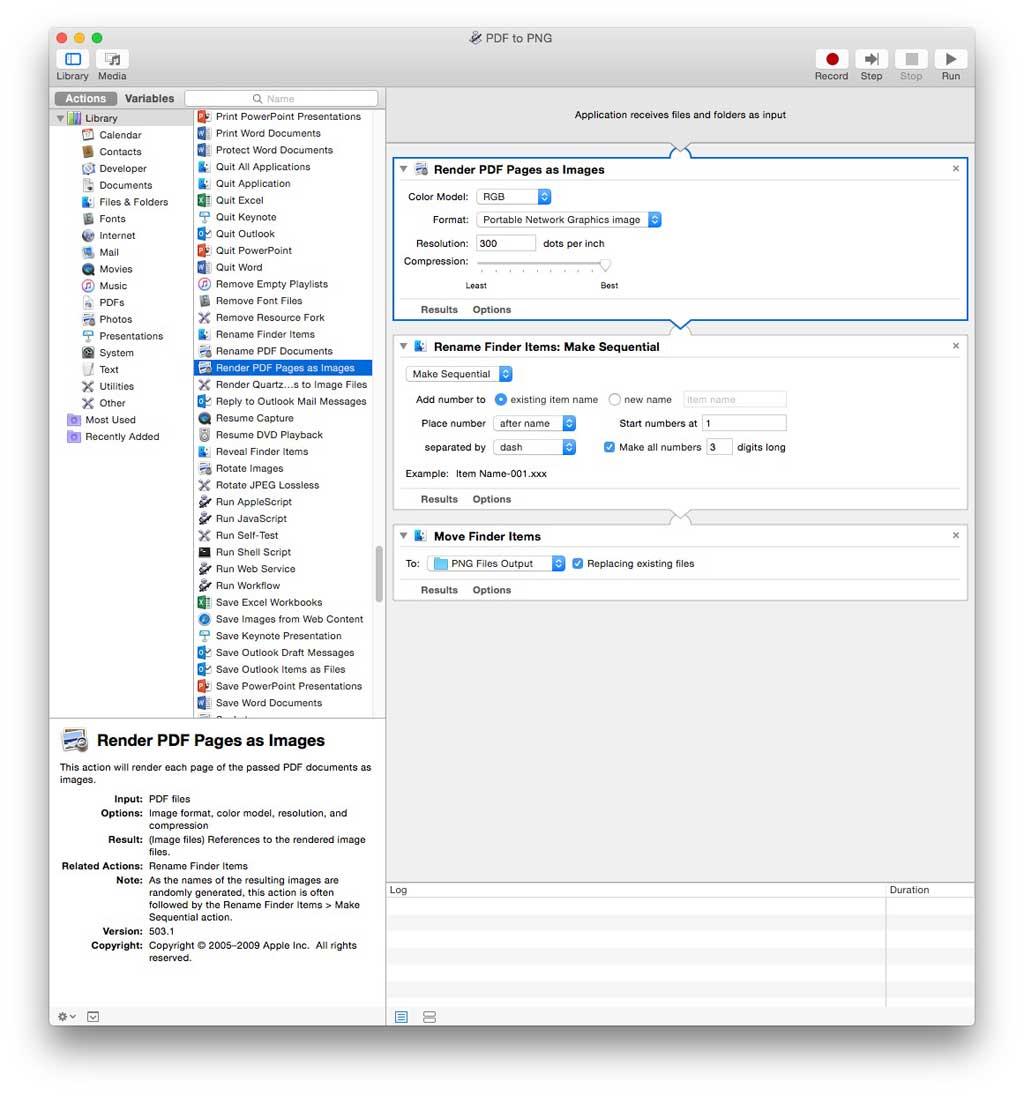
- Open Automator
- Choose “Application”
- Drag the “Render PDF Pages to Images” action onto the workflow.You could leave it at that but this action produces random filenames so it’s nice to follow it with a “Rename Finder Items” action as well.
- Drag the “Rename Finder Items” action into the workflow (choose “Make sequential” from the dropdown list
- Then add a “Move Finder Items” action to the workflow and decide where you want your new files to be saved.
- Save your new application somewhere – call it something sensible like “PDF to PNG”
- To use your new application simply drag files onto it within Finder.
- Enjoy.
‘Automator Applications’ are self-running workflows which means that any files or folders dropped onto an Automator Application will be used as input to the workflow. So, all you have to do is drop a PDF file onto this new ‘PDF to PNG’ Automator Application and hey presto, it’ll convert the PDF file for you, converting each page of the PDF file into a PNG image and saving it to the folder you specified in the workflow.
Some Background.
You may be wondering why I need to do this? Well, before creating this PDF to PNG Automator Application I’d been achieving the same result using batch processing in Photoshop CS4. After creating a stunning looking chapter of our weblog book in Pages, I would export it as a PDF file and would then open that PDF file using Photoshop CS4. Photoshop would open each page of the PDF file as a separate image. Using the ‘Batch Processing’ features within Photoshop I could then get it to export all of these open images, saving them to a specific folder as PNG files. These files were then placed into the Booksmart application that is used to send completed books to Blurb for printing.
This sounds like an OK workflow, except for the fact that it takes a while. Photoshop CS4 is quite old and is only available as a 32 bit application. This means that despite having 24GB of RAM in my iMac, Photoshop can only address around 3GB of it. This meant that it was unable to cope with opening all of the pages of a large PDF file and I had to restrict it to about 20 pages at a time. It was also quite slow at exporting such large images as PNG files as well. [Edit: Even now that I’m using Photoshop CC 2020 it’s still a very long-winded process]
This wasn’t a huge problem as I could just leave it batch processing them whilst getting on with other things, but this new PDF to PNG Automator Application should save a few steps and should be much quicker as well. Just a nice little time-saving tip thanks to OS X and Automator. You can of course change the settings within the Automator workflow to adjust the image quality, resolution etc and the type of image file it outputs, JPG’s GIF’s, TIFF’s, PSD’s and lots of other options are available.
The only small issue with it is that it does still take quite a bit of time to do with large pdf files that contain lots of pages and as it is an Automator Application, there isn’t anyway of seeing any feedback in the form of a progress bar. If I could add a progress bar to it that would make it perfect.
Did you find this useful? Let me know in the comments below and feel free to Buy me a Coffee to show your support.
Discover more from A Simple Life of Luxury
Subscribe to get the latest posts sent to your email.


Well, I had an email from Blurb saying that the last volume of our weblog book that I uploaded was too large for their printers so it was time to make some changes to the file so that I could get it printed ready for Christmas. They suggested added the images to their booksmart application as jpegs rather than png’s. A quick change to the Automator Application so that it saved the files as jpg’s rather than png’s should do the trick and hey presto in no time at all a job that would have taken hours was done and the book was once again ready to be sent off for printing, this time full of jpg images rather than png’s.
This took the file size from 5.74GB down to 1.38GB so hopefully it’ll be OK for their printers. I just hope that no image quality has been lost in the process. It’s still going to take the best part of 12 hours for me to upload that over our Internet connection but at least the process of batch processing was much quicker.
Al.
Brilliant – thank you! Worked on the first try. I think there’s a minor step missing – after opening the Automator and choosing ‘Application’, you need to select ‘New’ from the File menu. It might also be helpful to specify that you when you drag a PDF directly onto the new application, you do so in Finder.