The Ultimate GoPro/Insta360 Windsurf Mount
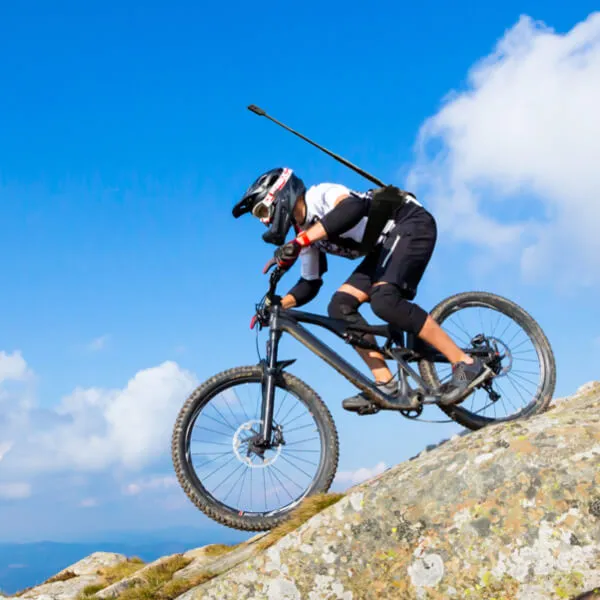
I’ve tried a number of different mounting options for my GoPro and Insta360 camera’s over the years. For certain sports a helmet mount or handlebar mount are obvious, for windsurfing though it keeps evolving. There have been helmet mounts, boom mounts, mast mounts and plenty of variations on this theme. One of my favourites, especially with the Insta360 camera was a pole mounted on the back of my harness so that the camera sits just behind my head and gives the impression of a drone following me around.
Insta360 Back Bar Pole Mount
The first incarnation of this was a solution direct from Insta360 called the Back Bar. This was essentially a waist band/harness with an attachment point for the Insta360 Selfie Stick. The Selfie stick screwed onto the attachment, the camera screwed onto the top of the selfie stick in the normal fashion and the camera was in position. In theory this was fine. There are lots of cheaper versions of this design but I bought the original, genuine Insta360 components hoping they would be better quality. To cut a long story short, they weren’t! Further investigation showed that the other cheaper versions weren’t any better either.
I’ll admit that the forces present in windsurfing are probably more than in any other sport I’ve done. So, any camera mounting system would have to put up with quite a bit of abuse. The Insta360 options just weren’t up to the task. I needed something that could cope with the rigours of windsurfing.
Custom Mounting Solution
This is where my Dad came into the equation. He’s pretty handy at making things, so once I had a basic design in my head I took it to him. He (obviously) just happened to have had what looked to be the perfect length of carbon fibre tubing hanging around. Armed with my design ideas, and some options I’d thought of to improve on the commercially available systems, he set to making it into a workable prototype. I left the details of manufacturing and engineering to him.
The carbon fibre pole is actually quite a bit longer than a selfie stick. It is lighter in weight, tapered and being a single length of carbon fibre is hopefully much stronger. It’s actually the base of a fishing rod so is pretty strong and will have some flex in it too
Connections

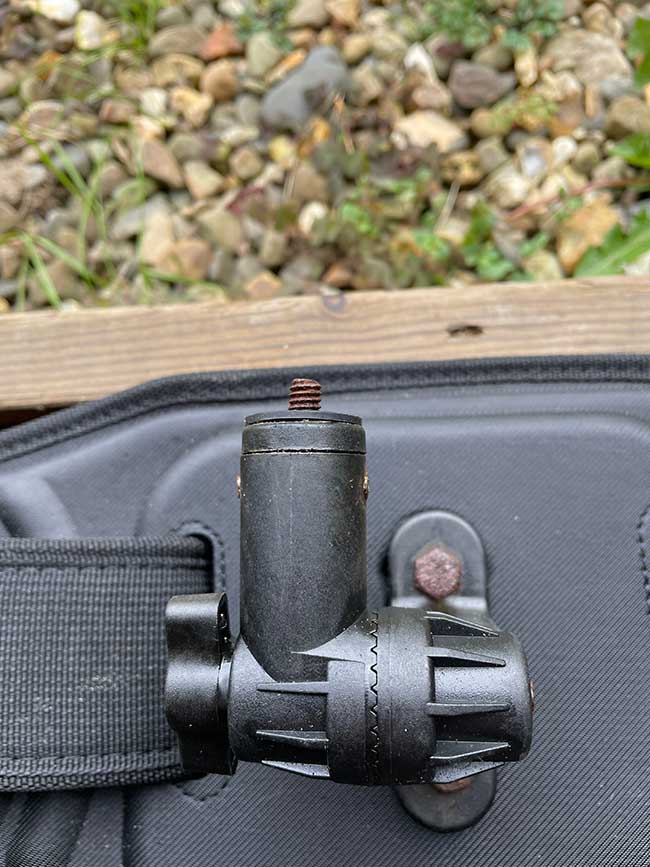
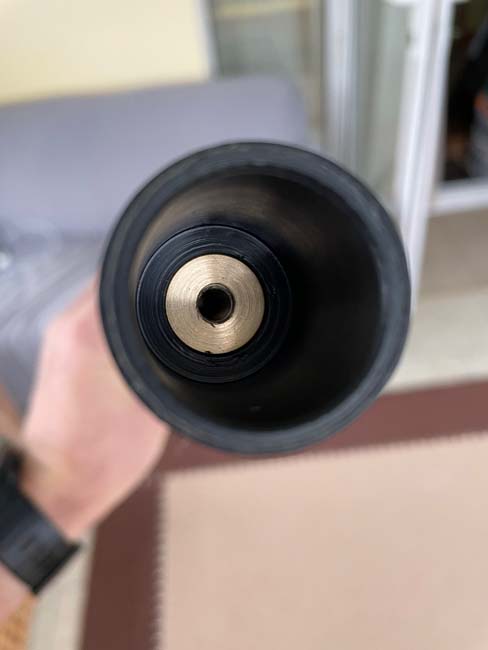
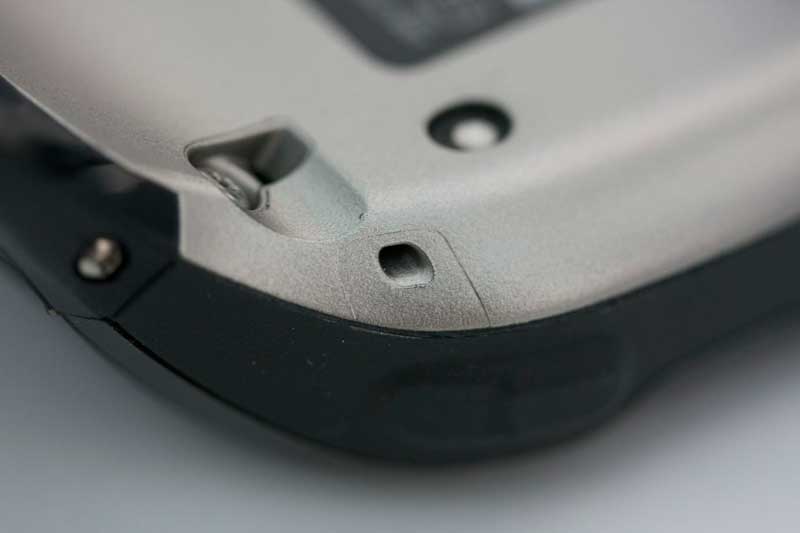
My Dad constructed a standard tripod mount for the top of the pole so that the camera and its housing could be attached to it. This was made of brass, had a longer screw than a normal tripod mount and was of course beautifully engineered to fit the carbon tube perfectly and not only look nice but feel nice too. I was able to use a longer screw than that of the standard tripod mount as I tend to house the Insta360 in a Utility Frame. This frame not only protects the camera but also offers attachment points for GoPro accessories or for tethers. It also has a screw mount. The longer screw was able to screw into the frame and then continue to screw into the camera. This of course is stronger than the normal tripod mount that would only screw into the frame. This end wasn’t really an issue on the original Insta360 version, but the new version is going to be much better anyway.
The main issue with the Insta360 version was that the bottom of the selfie stick simply screwed onto a standard tripod mount screw and sat on top of the bracket on the back-bar. This was never going to be a strong enough attachment. The short length of the tripod mount could never withstand the forces exerted on it by the selfie stick. Once the weight of the camera was attached to the top it was only making matters worse. There was just too much swing weight and leverage on a tiny little tripod mount screw. It worked once or twice but soon failed. This failure was exacerbated by the fact that the thread holding the threaded bung to the bottom of the selfie stick was terrible too. I think the bung was made of steel and the selfie stick was made of aluminium so the aluminium thread sheared off in no time
Improvements
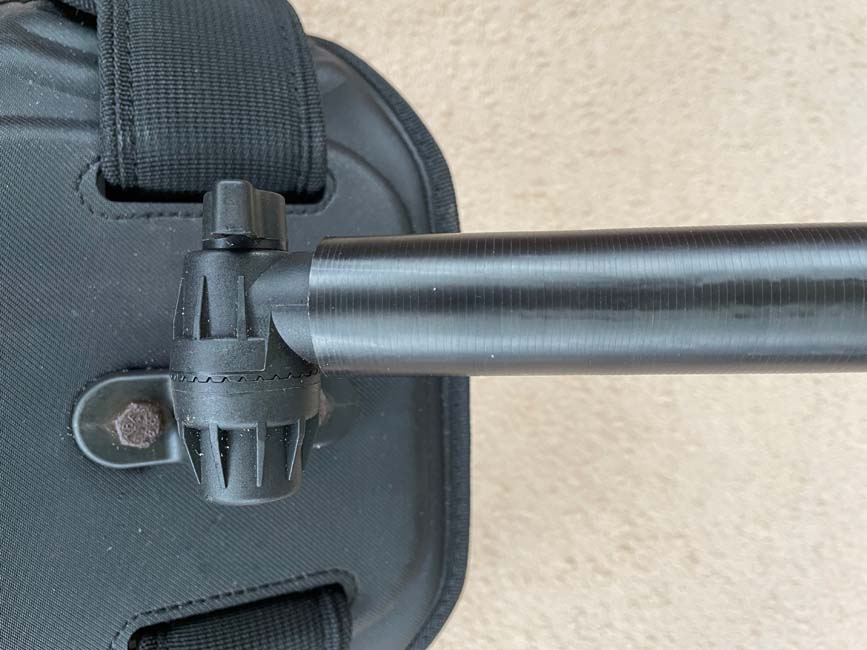
My idea was to make it so that the bottom of the hollow carbon fibre pole slotted over the mount on the Back Bar and then screwed into a thread that was attached internally and situated within the carbon fibre pole. The thread and screw would also be considerably longer than a standard tripod mount. Not only would the longer screw provide a better connection but the fact that the carbon tube fits over the mount would mean that it couldn’t wobble about even if it wasn’t attached with a screw.
My dad had to make a few adjustments to the bracket on the back-bar. These weren’t massive adjustments, just enough to make sure the carbon tube could fit snuggly over the bracket without the screws that held the bracket together getting in the way. While he was at it he upgraded these screws to ones of a better quality and of course replaced the short tripod mount screw with a longer stainless steel one.
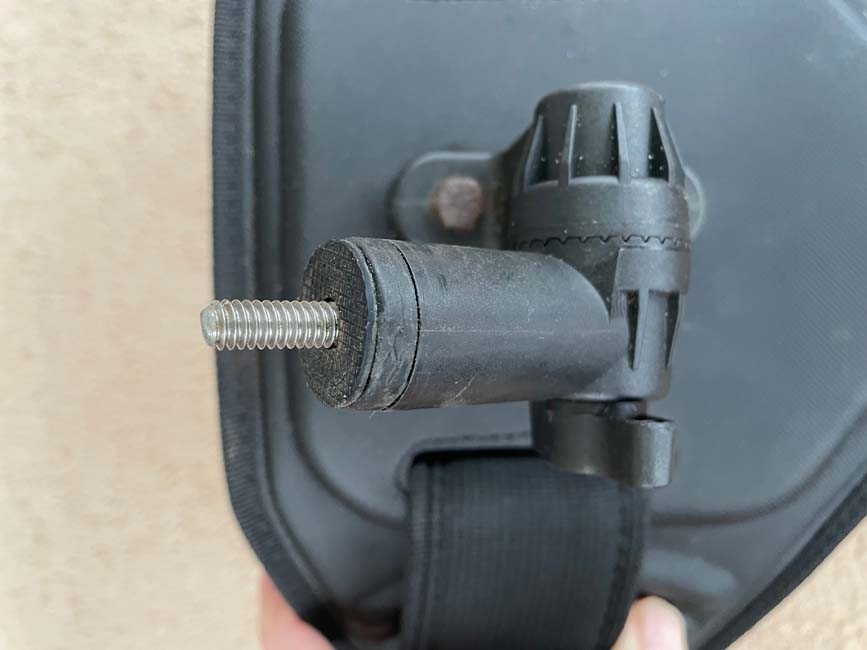
The carbon fibre tube now fits over the bracket perfectly. I’m not sure if it was luck or if he had to cut the pole to size to get such a snug fit, but it couldn’t be any better. The internal diameter of the bottom of the pole is exactly the same as that of the bracket so it’s a tight fit.
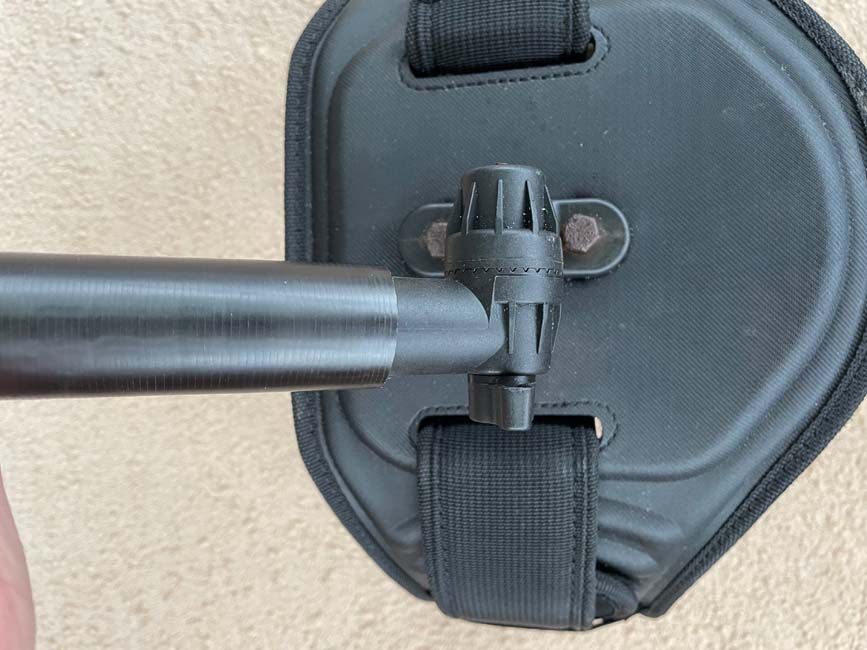
It slots on about 3 cm at first before the screw on the top of the bracket comes into contact with the bung he has inserted into the bottom of the pole. Just this 3 cm connection feels quite strong and is certainly a lot better than the Insta360 selfie stick attachment.
However, inside the tube is a perfectly engineered bung contain a female thread for the screw. I’m not sure if my Dad 3D printed this bung or made it from something else. His original plan was to 3D print it, but I think in the end he shaped it from some strong plastic rod that he had. Once again it is of course a perfect fit, is at least an inch long and is bonded to the inside of the pole. Considering the fact that it is hidden away and will never be seen the finish is as neat and tidy as could be.
So, once the pole is slotted onto the bracket for the initial 3 cm or so, it then screws onto the thread and continues to slot over the bracket for another 2 cm. This gives a full 5 cm of insertion into the pole and 2cm of threaded connection.
Additional Features
An additional feature of what is now hopefully the ultimate GoPro/Insta360 mounting option for windsurfing is something that you can’t see. Inside the pole, connecting the camera mount at the top of the pole to the bung and screw mount at the bottom of the pole is a cable that joins the two. This is a fail-safe just in case the carbon fibre pole should snap. If it does, the camera will still be connected to the bracket at the bottom by the cable and won’t therefore be lost at sea. I always used to tether the camera to my harness using some rope or kite leader-line. I’ll probably still do so anyway just because being able to see the tether gives some peace of mind, but, in theory, this shouldn’t be necessary as the mounting pole has an internal tether that serves the same purpose but in a much neater, out-of-sight fashion.
Additional to this tether feature is the fact that the carbon fibre tube is hollow and is now sealed at both ends – It will therefore contain air and will float. I haven’t yet checked to see if it will have enough buoyancy to keep the camera afloat as well, but it may well do so. If it does, that’ll be a nice little feature too.
Testing
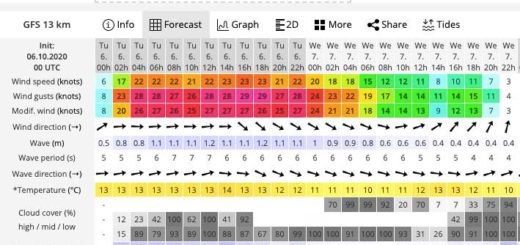
I’m still waiting for suitable conditions to test it in earnest. It’s always difficult to tell how something such as this will cope with the rigours of windsurfing, but I can tell that it is much stronger than the Insta360 option. There are fewer points of failure, those points of failure that do exist are much stronger and much better engineered. Not only that, but it’s lighter, longer and looks much better too. I can’t wait to try it out and get some footage.
Discover more from A Simple Life of Luxury
Subscribe to get the latest posts sent to your email.
2 Responses
-
[…] through the valley and a midday high tide. It was also the first opportunity I had to try out the new camera mount that my Dad had made for […]


Your Dad said glad you’re pleased…..hope it works when you get the chance tomput it to the ultimate test !